Setting up and optimizing your Auking Mini Projector can greatly enhance your viewing experience. Whether you’re using it for movies, presentations, or gaming, proper setup ensures you get the best possible performance from your device. This guide will walk you through the essential steps to set up and optimize your Auking Mini Projector.
Unboxing and Initial Setup
What’s in the Box
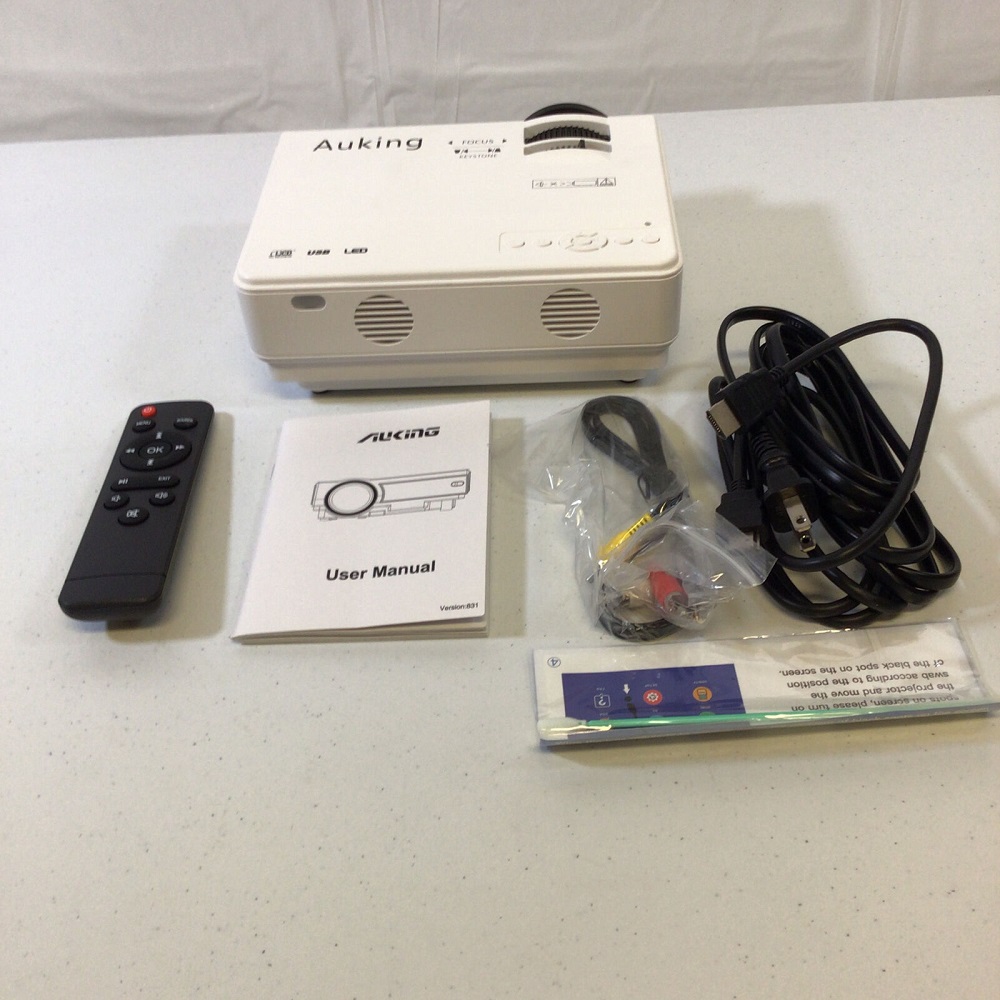
When you unbox your Auking Mini Projector, you will find several components. These typically include the projector itself, a remote control, power adapter, HDMI cable, AV cable, and a user manual. Ensure all items are present before starting the setup process.
Check each component for any damage. Knowing what’s in the box helps you understand how to proceed with the setup. This step ensures you have everything needed to get started. A quick inspection prevents future issues and ensures a smooth setup process.
Placement and Environment
Choosing the right location for your projector is crucial. Place the projector on a stable surface, at a suitable height and distance from the screen or wall. The ideal distance varies, but generally, placing it 5 to 10 feet away works well for most settings.
Ensure the area is dark or dimly lit to get the best picture quality. Ambient light can wash out the image, reducing clarity and contrast. Proper placement and a dark environment help optimize the viewing experience. This makes the projected image clearer and more vibrant.
Connecting Your Devices
HDMI Connection
HDMI is the most common and reliable way to connect your devices to the projector. Use the provided HDMI cable to connect the projector to your laptop, gaming console, or other HDMI-compatible devices. Plug one end of the cable into the HDMI port of your device and the other into the projector.
Switch the input source to HDMI using the remote or on-projector controls. This method ensures a stable and high-quality connection for both video and audio. HDMI connections are straightforward and provide the best performance.
AV and USB Connections
If your device doesn’t have an HDMI output, you can use the AV or USB ports. The AV cable allows connection to older devices like DVD players. Connect the yellow, red, and white plugs into their corresponding ports on the projector and device.
USB ports can play media files directly from a flash drive. Plug your USB drive into the projector’s USB port and use the remote to navigate through the files. These alternatives offer flexible options for various devices.
Adjusting Image and Focus
Keystone Correction
The Auking Mini Projector includes keystone correction to adjust the image shape. If the projected image looks trapezoidal, use the keystone correction dial. This feature helps align the image properly, making it rectangular.
Keystone correction is vital for ensuring a well-proportioned image. Adjust the dial until the sides of the image are straight and parallel. Proper keystone correction enhances the viewing experience by maintaining the correct aspect ratio.
Focusing the Image
To achieve a sharp image, use the focus ring located on the lens. Turn the ring slowly while observing the image. Stop turning when the image appears in clear focus.
A properly focused image is crucial for clarity and detail. Make sure the edges are crisp and the text is readable. Focusing ensures that viewers do not strain their eyes. Proper focus enhances the overall image quality.
Optimizing Audio
Built-in Speakers
The Auking Mini Projector comes with built-in speakers. While they are convenient, they may lack depth and volume for larger spaces. Use the remote or on-projector buttons to adjust the volume to your desired level.
Built-in speakers are sufficient for small, quiet rooms. For an improved audio experience, use the projector’s external audio options. Built-in speakers provide basic sound but may need enhancement for better quality.
External Audio Options
For superior sound, connect external speakers or a sound system. Most projectors have a 3.5mm audio output or Bluetooth capability. Use these to connect to external devices. Plug in a speaker or use Bluetooth settings to pair with wireless audio devices.
External speakers provide richer, louder, and more immersive sound. This setup is ideal for movie nights or presentations in large rooms. Using external audio enhances the overall experience, providing better sound quality and immersion.
Updating Firmware and Software
Checking for Updates
Manufacturers periodically release firmware updates to improve performance and add features. Check the user manual or manufacturer’s website for update instructions. Access the settings menu on the projector to see if updates are available.
Firmware updates can fix bugs and enhance functionality. Regularly checking for updates ensures your projector runs smoothly. Keeping the firmware up to date maintains optimal performance.
Installing Updates
Follow the provided instructions to install any updates. This may involve downloading files to a flash drive and inserting it into the projector’s USB port. Navigate to the update section in the settings menu and follow the prompts.
Installing updates keeps your projector current and functional. Ensure the projector has adequate power during updates to prevent issues. Updated software and firmware enhance the projector’s features and reliability.
Enhancing Picture Quality
Calibration Settings
Calibrate your projector for the best picture quality. Adjust brightness, contrast, color temperature, and other settings. Access these options via the settings menu.
Calibration tailors the image to your preferences and environment. Use test patterns or a calibration tool if available. Proper calibration enhances color accuracy and overall image quality. Fine-tuning these settings optimizes the viewing experience.
Screen Material and Placement
Using a proper screen enhances image quality. A plain white wall works, but a projector screen is better. Screens designed for projectors improve brightness and contrast.
Positioning the screen correctly is essential. Ensure it’s flat, smooth, and free of obstructions. Use a screen or wall mount for stability. The right screen material and placement significantly improve the projected image’s clarity and brightness.
Maintenance and Care
Regular Cleaning
Keeping your projector clean ensures long-term performance. Dust affects image quality and can overheat the device. Use a soft, dry cloth to clean the lens and exterior. Avoid harsh chemicals that can damage the components.
Regular cleaning prevents dust buildup and enhances performance. Check the air vents and clean them to prevent overheating. Proper maintenance extends your projector’s lifespan.
Proper Storage
Store the projector in a cool, dry place when not in use. Use the original box and packaging for protection. Avoid areas with extreme temperatures or high humidity.
Proper storage prevents damage and prolongs the projector’s life. Keeping it in a safe place reduces exposure to harmful elements. Storing the projector correctly ensures it remains in good condition for future use.
Conclusion
Recap of Key Points
Setting up and optimizing your Auking Mini Projector involves several important steps. Start with proper placement and environment setup. Use HDMI, AV, or USB connections to link devices. Adjust keystone and focus for a clear image. Enhance audio with external speakers if needed. Check for and install firmware updates. Calibrate picture settings and choose the right screen material. Finally, maintain and store the projector correctly.
Final Thoughts
By following these steps, you can greatly enhance your projector’s performance and enjoyment. Proper setup and optimization ensure you get the best possible experience. Whether for home entertainment, presentations, or gaming, your Auking Mini Projector can deliver excellent results. Investing time in the initial setup and ongoing maintenance will pay off with superior image and sound quality. Enjoy your enhanced viewing experience and make the most of your projector’s capabilities.