Watching movies at home can be an exhilarating experience, particularly when you have a large screen to enhance the visual appeal of your favorite films. However, purchasing a commercial projector screen can often break the bank. Thankfully, creating a budget-friendly DIY projector screen is both feasible and straightforward. This guide explores various materials and methods to create the ideal screen for your movie nights without spending a fortune.
Assessing Your Space
Determine Screen Size
Before diving into materials, it’s essential to assess and determine the ideal size of your projector screen. Measure the space where you plan to set up your projector and screen. Consider the distance from the projector to the screen; a common rule states that the screen width should be about one-third of the distance from the projector. This ensures a clear and impactful viewing experience. Additionally, account for the height at which you’ll set the screen. A well-situated screen allows everyone to see comfortably, so don’t overlook this detail.
Select the Right Location
Next, choose a suitable location where the screen can be easily viewed by all attendees. Your living room or a cozy outdoor area in your backyard could serve as excellent locations. Ensure that the area is dark enough for optimal viewing; however, if you choose to watch outdoors, consider potential environmental factors like wind or insects. It’s also important to ensure there are no obstructions, like furniture or lighting, that might interfere with the picture quality. Selecting the right spot can significantly enhance your overall movie-watching experience.
Using White Sheets
Simple and Effective
One of the easiest and most cost-effective ways to create a projector screen is to use a plain white bed sheet. Cotton sheets work particularly well, as they provide a smooth and consistent surface that reflects light effectively. Simply hang the sheet on a wall using thumbtacks, tape, or clips, depending on your preference. Make sure the sheet is taut and wrinkle-free, which is crucial for a clear image. Wrinkles can distort the projection, reducing clarity and quality.
Benefits of Sheets
The major advantage of using sheets is their accessibility. Most people have an old white sheet at home that they no longer use, making this solution virtually free! When it’s movie night, you can effortlessly erect the sheet and remove it after viewing. This feature is perfect for those who wish for a quick setup and takedown. Moreover, sheets are lightweight and portable, so you can even take them along if you’re planning movie nights with friends or family elsewhere.
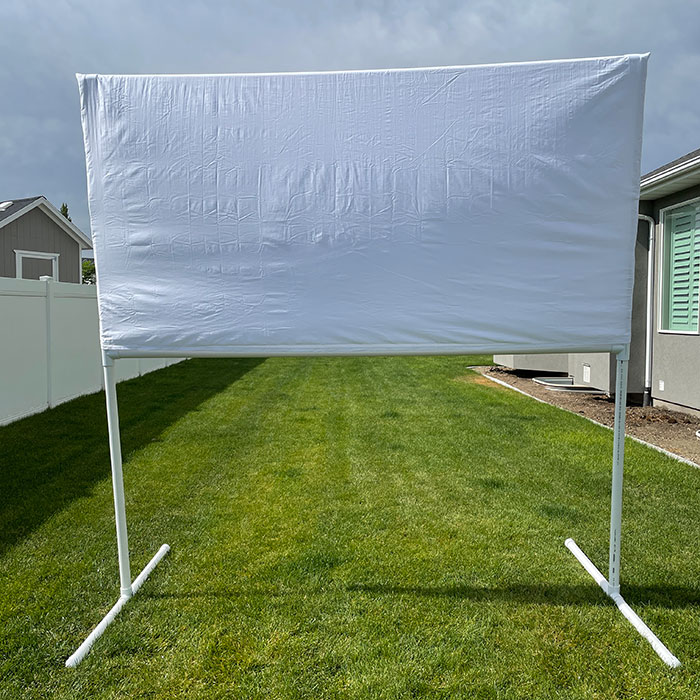
PVC Pipe Frames
Constructing the Frame
For a more structured and visually appealing approach, consider building a frame using PVC pipes. This setup not only provides a professional appearance but also adds considerable stability. Take precise measurements of your desired screen size, then purchase the appropriate amount of PVC pipe from your local hardware store. Cut the pipes into suitable lengths and assemble them into a rectangular frame using PVC elbow connectors for each corner. This project can be completed in a couple of hours and offers a durable framework for your screen.
Attaching the Screen
Once your PVC frame is constructed, it’s time to attach a white sheet or purpose-made projector screen fabric. Pull the fabric taut and secure it using clips, staples, or Velcro to ensure it stays in place. This setup will offer a stable, wrinkle-free surface for projection, giving a much clearer picture than a draped sheet. You can even paint or decorate the frame to match the surrounding décor, enhancing the aesthetic of your movie night setting and making it feel more special.
Projector Screen Paint
Applying Specialized Paint
If you’re looking for a more permanent solution, you may consider using specialized DIY projector screen paint. This kind of paint is designed to reflect light effectively, enhancing image quality and definition. Choose a smooth wall or a large canvas as your base. Prepare the surface by ensuring it is clean and applying a primer if necessary to enhance adhesion. Once the surface is ready, it’s time for the fun part—painting!
DIY Application
Purchase DIY projector screen paint from your local store and follow the specific instructions for application carefully. Most applications will require multiple coats for optimal performance. Allow each coat to dry properly before applying the next to achieve a smooth and even finish. Once completed, you’ll have a permanent projection surface that can transform any movie night into a high-definition experience for years to come, enhancing the quality of both film and ambiance.
Tension Rods and Fabric
Using Tension Rods
Another budget-friendly option involves using tension rods, which are practical for movie setups that may require flexibility. Tension rods can be installed in windows or door frames, creating a classy and adjustable screen solution. Measure the desired height and width of the area where you plan to set up the screen. Purchase tension rods that fit these dimensions, allowing for easy adjustments based on watching preferences.
Choosing the Fabric
For the screen, select a piece of white blackout fabric that blocks light effectively while providing a vibrant image during projection. Hang the fabric from the tension rods and ensure it is smooth and free of wrinkles, which can distort the picture quality. This setup not only functions well but is incredibly easy to remove and store when not in use. You can also experiment with different fabric types to find one that best suits your viewing needs, such as those that might enhance brightness or color contrast.
Utilizing Projector Screen Fabric
Purchasing Screen Fabric
If you prefer a high-quality finish, consider investing in dedicated DIY projector screen fabric. This specialized material is designed specifically for projection and provides excellent results in terms of clarity and sharpness. Measure the dimensions for your intended screen area and purchase enough fabric to cover that size adequately. While this option may involve a small investment, it typically costs less than commercial pre-made screens and offers a custom result tailored to your space.
Mounting Options
Once you’ve secured your fabric, you have various mounting options at your disposal. You can attach your DIY projector screen fabric to wooden frames, tension rods, or even directly to a wall using Velcro strips, depending on what best suits your needs. Just make sure to pull the fabric tight to avoid sagging or wrinkles. A well-installed screen adds a touch of professionalism to your setup and ensures everyone can enjoy a fantastic viewing experience.
Outdoor DIY Screens
Creating an Outdoor Experience
For those lovely summer nights, setting up an outdoor movie screen can be an unforgettable experience. An easy option is to repurpose a large white sheet or purchase a purpose-built outdoor screen. If using a bed sheet, look for a suitable space to hang it, such as a sturdy fence or between two trees. Make sure the sheet is taut to ensure the best image quality.
Inflatable Screens
Inflatable screens can also be a fantastic outdoor solution. While they may require a small investment upfront, many options are available that are quite affordable. These screens are easy to set up and take down, making them perfect for spontaneous movie nights under the stars. Pair them with cozy blankets and bean bags to create an outdoor cinema atmosphere, complete with popcorn and drinks for a complete experience.
Conclusion
Creating a budget-friendly DIY projector screen can greatly enhance your movie nights at home, giving them a special touch. Whether you opt for a simple white sheet, construct a PVC frame, apply specialized projector paint, or use any of the other budget-friendly options outlined, you can easily set up an impressive viewing experience without breaking the bank. Take the time to assess your space, pick the best materials, and get creative.
Most importantly, remember that the goal is to have fun and enjoy quality time with family and friends while watching movies. With these DIY ideas, you’re now equipped to create the perfect setup for a movie night. So grab some popcorn, dim the lights, and enjoy the show! Whether it’s a classic film or the latest blockbuster, your enhanced viewing experience is sure to create lasting memories.